Using Riak to understand how Erlang applications are packaged and started

You’ve learned the syntax, had a dabble with OTP, and found the time to create a few toy projects — but now you want to build or take apart a real-world Erlang application.
How is the production version of an application created, and how is it started up? In this post I’ll be digging into the source code of riak to answer these questions.
What we’ll see is that:
- To generate the deployable package (a release) a makefile wraps up a few calls to rebar
- rebar gets dependencies, compiles the app, & uses reltool to create a release complete with all the bits and pieces to run it
- The application is started using erlexec, that uses boot files from the release
- A shell script is used to wrap up most of the above complexity
By the way, I don’t code Erlang for my day job so please keep that in my mind when using this information. Also, feel free to tell me if I’m doing bits wrong.Create a release with rebar & reltool
Riak’s Makefile contains a “rel” target which is the entry-point for generating a release. Here are the relevant bits:
https://gist.github.com/NTCoding/5150286.js
It’s first telling rebar to look in the rebar.config file for dependencies and to download their binaries (beam files) into the deps folder of this project. The compile command tells rebar to compile the .erl files into .beam files for this project.
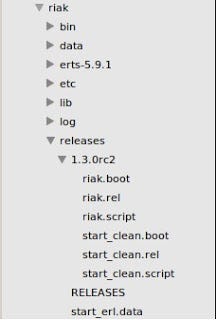
Now the interesting bit, the “generate” rebar command will create a release for this application. When that’s done a release is added to the “rel” folder in the root of the project, and will look like this:
Digging into the generated release
** ** How did the release folder get named “riak”, and how did all those files end up there when a lot of them look specific to the riak application? For this, rebar uses reltool which relies on instructions & settings in reltool.config (at the bottom of the image above).
At the top of reltool.config we can see the application name and version (see image below). The release is called “riak”- explaining why the directory is called riak (see image above).
https://gist.github.com/NTCoding/5150597.js
At the bottom of the same file we can see some overlays, which (I believe) are specific to rebar, and not acknowledged by reltool:
https://gist.github.com/NTCoding/5150616.js
These overlays are almost self explanatory, except for maybe “template”. Template extends copy by substituting the value of any variables in the file with values from vars.config, as instructed in the line beginning “{overlay_vars”.
For example, look at the template instruction with the values “files/riak” and “bin/riak”. If you look at the first image showing the folder structure, you can see a file called “riak” in the /rel/files folder and you can see one inside the release’s bin folder (/rel/riak/bin) which was copied during release generation.
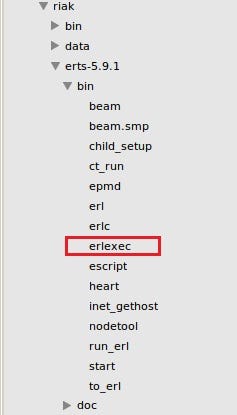
It’s also worth mentioning the “erts-5.9.1” folder — this is an executable version of the erlang runtime, while the lib folder contains all the compiled applications referenced by this project.Start the application with erlexec
Now the application has been packaged up with everything it needs to run, how is it going to be started? There’s one directory in the release I haven’t mentioned yet — I’ll use it to answer that question.
If we open up the “releases” directory we’ll see this:
Inside the “releases” directory there is a folder “1.3.0rc2” which matches the version that was specified in the reltool.config file. The files that make up this directory are explained in detail on the erlang website. To quote them:
“When starting Erlang/OTP using the boot script, all applications from the .rel file are automatically loaded and started:”
In this case, “riak.boot” is the boot script.
It feels like we’re close to the prize here, we just need something to kick these boot scripts off by the looks of things. Fortunately, we can find exactly what we are looking for in the /rel/riak/bin/riak shell script. It will execute the following when you call “riak start” or “riak console” from the command line:
https://gist.github.com/NTCoding/5150677.js
…where the $BINDIR is the erlang bin directory (/rel/riak/erts-5.9.1) as per the screenshot below:
That command starts the erlang vm in boot mode (using –boot flag) instructing it to look in the release folder for riak.boot & riak.script. It also tells it to start the vm using the args from the vm.args file (which was another of the overlay commands in reltool.config).
The other two flags just tell it to start in embedded mode (-embedded = no console) and add some directories to the path (-pa [directory path]).Sanity check with escript
When riak was started using “/rel/riak/bin/riak start” the application should have begun along with all of its dependencies. We just need to confirm that now to complete this tutorial. To do so we’ll see how riak uses escript to query theapplication which should now be running.
As part of the release, the erlang runtime bin directory contains a file called escript which you can see in the prevous image (just below erlexec). escript is basically an erlang interpreter — you don’t need to compile the code to run it.
Next to the riak shell script, there is also a riak-admin shell script that uses escript to execute the erlang code in the nodetool file (this also lives in the erlang bin folder). Nodetool is typically defined and executed like this:
https://gist.github.com/NTCoding/5150701.js
So when I run “riak-admin status” it is telling escript to dynamically execute this code from the nodetool file:
https://gist.github.com/NTCoding/5150712.js
…which is making an rpc call to riak_kv_console:status() in the riak_kv application (the arguments given in the shell script). If I run “riak-admin status” then, I would expect to see the output of riak_kv_console:status() for the running riak node:

Sweet :)
Next time I’ll be looking into Erlang’s supervision tree — again using riak.